
"I have learned to use the word 'Impossible' with the greatest caution"
Wernher Von Braun
Wernher Von Braun
Much of this information is currently under review - just to be sure I am up to speed with current techniques etc.
MindAperture - part 1
The Mind has a much greater aperture range than the camera.
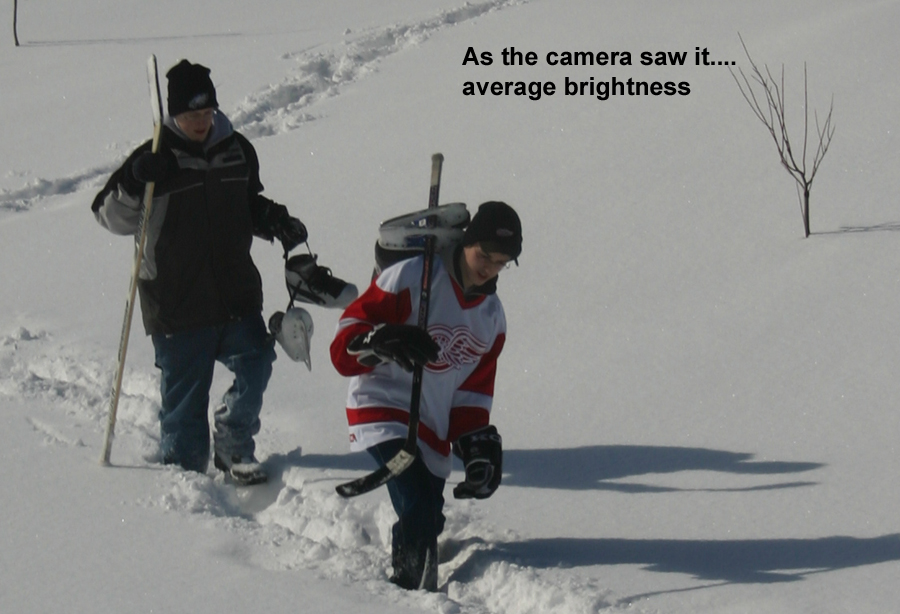
Ever notice how well you can see in the dark, say around a campfire, and yet, the camera needs to have a flash, and even compensating and underexposing on purpose – it never seems to be right. Or how when you're out on a bright winter's day, and the photos you take always seem to come out blah… Ok well I suppose there's a whole lot we can talk about on this topic, and I will break it down into a number of parts from simplest (early results) to the more complicated.
For those who've read the articles about this and understand, you can go ahead and skip this. For those who walk around with their cameras on manual exposure… move along, nothing to see here. I've been asked by a number of people why these kinds of things happen (not the people who set the cameras to manual, the dark and light thing). It is, in fact, reasonably easy to explain. It's really a multi-part explanation, and we'll tackle it a bit at a time.
The plain-and-simple, down-and-dirty synopsis of part 2 is that the human eye can see a much greater range of brightness levels than can a camera's sensor, or even film for that matter. ...but we'll come back to this another day.
Part 1 - is basically this: If you accept that what I said is true above (the quickie part 2) then the trick is how to deal with it in most cases. As it turns out, the camera designers have accepted it, and so they've had to design their 'auto-exposure' camera settings to deal with it in the best way they know how.
Auto-exposure
The auto exposure systems on cameras - that which adjusts the shutter speed and lens opening (so Mr. Average-vacation-snapshot-taker doesn’t have to worry), is designed to make the camera easy to use for everyone. Easy to use for anyone who really doesn’t understand when to use a flash, or when the exposure will be too slow and his hand shaking will make the difference between little Bobby standing beside Niagara Falls or Bobby looking like he’s being washed away by the falls.
The cameras will average all the light in the viewfinder and set the exposure levels to give you (if it were a black and white picture) and average gray shot (the call it 18% gray – you can actually buy calibration cards that are reference 18% gray). This works most of the time. Most pictures that have an even mix of luminance between total darkness and total light the camera will give you something that you can make out most of the stuff in the scene (….but not all).
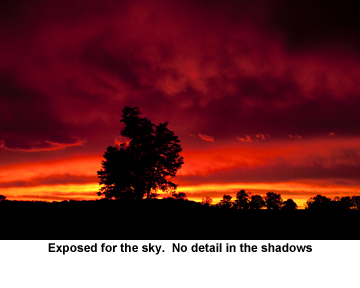
Our eyes and how our brain interprets various scenes are not “average” however. We might see someone standing with a bright sunlit window behind them. We see their faces, our eyes adjust… the camera however will average that scene so that the total amount of light reaching the film is 18% gray. So let’s say – that in that scene, the majority is bright sunlit window. The result… the bright sunlit window is darkened substantially, and so is the subject’s face. The result… you miss the detail, you might get the teeth in a smile but the rest is too dark. The opposite is often true, you might see a silhouette of a tree or a fence, against a sunset, so you compose properly, but the camera thinks you want as much of each as possible. The result is a washed out sunset, and no silhouette – in fact, much more detail than you might have even noticed when you took the shot.
Exposure Compensation
So, how do we get around this? It requires a bit of thought – actually, it requires quite a bit of thought (or so it always seems when you're rushing to get the shot), but when you reason it out, and you see the results, you’ll know it was worth it. Your camera has a control where you can set an exposure compensation to under expose or over expose (it is always measured in “stops” or perhaps EV - exposure value). This is usually a setting where you can adjust a + or a - value. And may have a symbol that looks like +/-
The times you will use these ideas and have to think about this kind of stuff….?
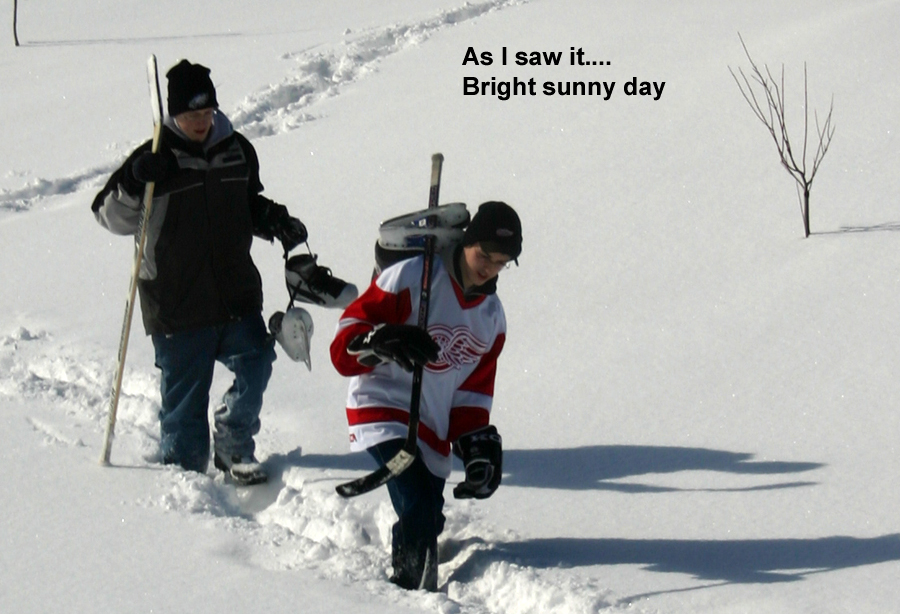
Well, scenario one, you are outside on a very bright sunny day in the winter. Snow all around and you want to take a picture of something, say a rabbit, in the very white snow. It’s not a close-up, and you want to emphasize the fact that it’s snow. The camera will try to adjust the exposure to give you an average luminance (gray) – the result… gray snow. If you use the exposure compensation feature to allow you to overexpose (let in more light) by a little bit, you can adjust this snow so that it looks more like snow and less like ash. In some cases you might set exposure compensation settings as far as +2. (you tell the camera that yes indeed you know it’s very bright but that’s ok).
Scenario two… this is tougher because you also run into the problem of holding the camera steady… you are sitting around a campfire… it’s dark, but your eyes have adjusted and you can see the faces lit by the fire (peoples faces roasting marshmallows)… your camera will see an overall scene too dark to capture without a flash. But in this case, the flash will ruin the ambiance of the campfire (And cause a whole lot of swearing and staggering around blind - hey - may even be dangerous!). Ahh, but we’ve figured out how to defeat the flash(the owner's manual) and we can hold the camera steady (tripod*)…. But the auto exposure on the camera will still try to compensate and make the majority darkness of the evening very gray… very long exposure times (and despite the camera being still someone will eventually move). In this case, you can adjust the camera's exposure compensation setting to a negative value (yes - you know it's a dark scene - but that's ok). So you underexpose the picture. The blacks are indeed very black… but the highlights are just right.
Ever notice how well you can see in the dark, say around a campfire, and yet, the camera needs to have a flash, and even compensating and underexposing on purpose – it never seems to be right. Or how when you're out on a bright winter's day, and the photos you take always seem to come out blah… Ok well I suppose there's a whole lot we can talk about on this topic, and I will break it down into a number of parts from simplest (early results) to the more complicated.
For those who've read the articles about this and understand, you can go ahead and skip this. For those who walk around with their cameras on manual exposure… move along, nothing to see here. I've been asked by a number of people why these kinds of things happen (not the people who set the cameras to manual, the dark and light thing). It is, in fact, reasonably easy to explain. It's really a multi-part explanation, and we'll tackle it a bit at a time.
The plain-and-simple, down-and-dirty synopsis of part 2 is that the human eye can see a much greater range of brightness levels than can a camera's sensor, or even film for that matter. ...but we'll come back to this another day.
Part 1 - is basically this: If you accept that what I said is true above (the quickie part 2) then the trick is how to deal with it in most cases. As it turns out, the camera designers have accepted it, and so they've had to design their 'auto-exposure' camera settings to deal with it in the best way they know how.
Auto-exposure
The auto exposure systems on cameras - that which adjusts the shutter speed and lens opening (so Mr. Average-vacation-snapshot-taker doesn’t have to worry), is designed to make the camera easy to use for everyone. Easy to use for anyone who really doesn’t understand when to use a flash, or when the exposure will be too slow and his hand shaking will make the difference between little Bobby standing beside Niagara Falls or Bobby looking like he’s being washed away by the falls.
The cameras will average all the light in the viewfinder and set the exposure levels to give you (if it were a black and white picture) and average gray shot (the call it 18% gray – you can actually buy calibration cards that are reference 18% gray). This works most of the time. Most pictures that have an even mix of luminance between total darkness and total light the camera will give you something that you can make out most of the stuff in the scene (….but not all).
Our eyes and how our brain interprets various scenes are not “average” however. We might see someone standing with a bright sunlit window behind them. We see their faces, our eyes adjust… the camera however will average that scene so that the total amount of light reaching the film is 18% gray. So let’s say – that in that scene, the majority is bright sunlit window. The result… the bright sunlit window is darkened substantially, and so is the subject’s face. The result… you miss the detail, you might get the teeth in a smile but the rest is too dark. The opposite is often true, you might see a silhouette of a tree or a fence, against a sunset, so you compose properly, but the camera thinks you want as much of each as possible. The result is a washed out sunset, and no silhouette – in fact, much more detail than you might have even noticed when you took the shot.
Exposure Compensation
So, how do we get around this? It requires a bit of thought – actually, it requires quite a bit of thought (or so it always seems when you're rushing to get the shot), but when you reason it out, and you see the results, you’ll know it was worth it. Your camera has a control where you can set an exposure compensation to under expose or over expose (it is always measured in “stops” or perhaps EV - exposure value). This is usually a setting where you can adjust a + or a - value. And may have a symbol that looks like +/-
The times you will use these ideas and have to think about this kind of stuff….?
Well, scenario one, you are outside on a very bright sunny day in the winter. Snow all around and you want to take a picture of something, say a rabbit, in the very white snow. It’s not a close-up, and you want to emphasize the fact that it’s snow. The camera will try to adjust the exposure to give you an average luminance (gray) – the result… gray snow. If you use the exposure compensation feature to allow you to overexpose (let in more light) by a little bit, you can adjust this snow so that it looks more like snow and less like ash. In some cases you might set exposure compensation settings as far as +2. (you tell the camera that yes indeed you know it’s very bright but that’s ok).
Scenario two… this is tougher because you also run into the problem of holding the camera steady… you are sitting around a campfire… it’s dark, but your eyes have adjusted and you can see the faces lit by the fire (peoples faces roasting marshmallows)… your camera will see an overall scene too dark to capture without a flash. But in this case, the flash will ruin the ambiance of the campfire (And cause a whole lot of swearing and staggering around blind - hey - may even be dangerous!). Ahh, but we’ve figured out how to defeat the flash(the owner's manual) and we can hold the camera steady (tripod*)…. But the auto exposure on the camera will still try to compensate and make the majority darkness of the evening very gray… very long exposure times (and despite the camera being still someone will eventually move). In this case, you can adjust the camera's exposure compensation setting to a negative value (yes - you know it's a dark scene - but that's ok). So you underexpose the picture. The blacks are indeed very black… but the highlights are just right.
MindAperture - part 2
In part 1 of this series we discussed how the auto-exposure and the metering system works on… well pretty much any camera that has a metering system. I should add that it's not just the auto-exposure system that works this way, it's the metering in general that works this way. The light meter in the camera tells you - actually "suggests to you" what the appropriate setting should be. It's up to you to accept these suggestions or override them.
The metering and exposure system is necessary because the media we use to capture the scene has it's limitations.
Sensors
I mentioned in part 1 that the sensor in your camera has a limited range of brightness levels that it can deal with. This is why we adjust exposure times and apertures. If you think of it this way - the human eye can see and deal with extreme (well actually - ALL) ranges of brightness - at least all the ones that are relevant to us. We could get into the physics of the electromagnetic spectrum, but for now lets keep it simple. On the "bright" side… there's nothing brighter than the sun. If you could point your camera at the sun (not suggested) and snap a picture of it - you wouldn't come close to capturing it. Displaying that picture on your monitor… well, they have yet to make a monitor with that kind of light output, and certainly, what you would get on a print - would be no brighter than the light that is reflected off the white of the paper. Make sense? The same goes for black (disregarding infrared - which is simply a translation of levels in effect). The camera can't hope to capture those extremes. In fact, the problem is quite a bit worse than that.
And film is not much better. In fact, depending on your intent, the digital sensor can provide more opportunities (but this is a debate which I won't get into right now).
So - how do you deal with this limited range? Well - fact is - we've been dealing with it since the dawn of photography. The real question is - how do you work with a media that may have a range different than what you see.
By far the best method of explaining how to deal with this limited range and translating it into a reasonable photograph is the explanation of the "Zone System" by Ansel Adams. His three books; "The Camera", The Negative" and "The Print" are some of the best reads on photography you can find. Thorough, and although they deal with black and white film, they are very much relevant to digital and even to colour photography today. The zone system was introduced by Adams, and he explains it well. The zone system essentially breaks down the dark-to-bright levels into zones. Once you have a good feel for your camera's range, you can use the zone system to improve your photos.
I think that by far the biggest factor in adapting what you see to the final photograph is in visualizing exactly what it is you are framing/focusing on/creating. I've said this before… start with a blank canvas in your mind. With an understanding of that limited range, create the image in your mind. Become thoroughly familiar with your camera's ability to capture the scenes, and understand the difference.
We've covered the metering system, and exposure compensation, and for scenes where the range of brightness falls within your camera's capabilities to capture this shouldn't be a problem (right?).
Histograms
Histograms
So how would you know if a scene exceeds the range of your camera? Most cameras have a tool called a histogram which allows you to quickly see how the range of brightness in the scene compares with the camera's ability to capture it. The histogram basically tells you how much of the scene is bright tones (right hand side of the graph) and how much of the scene is dark tones (left side of the graph). In example 1, the tones all fall within the camera's range. This photo is actually kind of dull, but it was a dull day… limited range of brightness. The graph peaks in the middle, indicating a) that the exposure is ok, and b) that there isn't much of the scene that's bright, nor dark.
Check your camera's manual to find out how to display the histogram. I'd venture to guess that every DSLR has this ability.
Easy huh? Problem is all scenes are not like this one. Thankfully too. As much as Andrew makes a good subject, the picture is pretty dull.
High Contrast
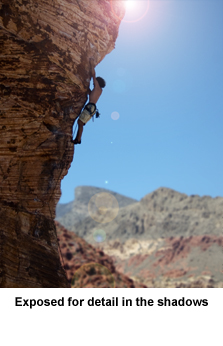
When the range of brightness falls outside the range of the camera's sensor, the histogram looks more like example 2. In this case, we are dealing with the leaf (in the middle range), the darkness of the rock outcropping (left hand side) and the bright sun hitting the background (the right side). What can you do in this situation? The best answer is: visualize! What are you trying to capture here? Expose for what you are trying to capture.
There are special techniques such as exposure blending, graduated ND filters and High Dynamic Range, but let's leave these topics for another day. Let's focus on what you can do with just a camera and a single shot.
For all the tones that fall outside the range of the camera - you just get either white or black - the limits. So in this case, all of the sunlit background, while I could look with my eyes and make out the rocks etc., because of the exposure I chose, these show up as just white. All the detail is lost here (not to mention - I left it out of focus anyway). The rock outcropping as well, has no detail. The detail is lost in the darkness.
What can you do about this?
What is your vision?
I could have used a flash, and adjusted the exposure if that's what I had wanted. In other words, in some cases, you can make the range of the scene fit the ability of the sensor. Artificial lighting is a topic unto itself.
If you visualize the silhouette of the fern then of course you are adjusting the exposure to properly expose the brighter areas of the scene, shifting all your tones to the left. This will result in more detail visible in the bright areas, and more shadows in the dark areas.
If you visualized more detail in the cock outcropping, you would expose for the darker tones. This has the opposite effect, shifting the histogram more to the right.
Shifting exposure like this has other effects on the photo - especially if done to extreme levels. Noise is one of the most noticeable. Again… we'll cover this later.
In this case I wanted the detail in the fern. I adjusted very slightly later on in Photoshop, but for the most part - I got what I wanted in the camera. Keep in mind that our own perception is typically to accept darkness and lack of detail in the shadows as normal. Extremely washed out bright levels with no detail are more difficult for us to accept. Except in the case of a high-key photograph, the human mind expects to see detail, even in the brightest scenes (and even in a high key lighting situation, the detail is present in the subject, where we want it to be).
Things to try:
Find the histogram on your camera. Try it out.
Try some extremes, visualize what you want, adjust the setting and compare the results to what you expected.
Find some articles that talk about the Zone System. See if it makes sense to you.
Practice lots
Practice some more.
Visualize.
I realize that these scenarios and explanations may seem a bit… silly. I have always thought, particularly in the days of film, where you couldn't see the results immediately, that it was a matter of trying to convince my camera to see what I was seeing (or more accurately - what I was visualizing). The point here is, that even in auto mode, you can have some control over what the camera is doing. Remember the whole point of taking the picture - what is it you want to capture? It's your canvas - paint on it what you visualize. Is the scene a bright scene, or a dark scene or is it an average scene? Try these controls. With digital you can see the results right away and you're not wasting film - dial in exposure compensation gradually if you aren't convinced (I had to do this the first time out on a sunny day in the winter - I couldn't believe it would work). Get out and experiment.
Next time we'll talk a bit more about this subject - a bit more in detail.
*Eventually I will discuss tripods and camera steadiness - stay tuned.
11Feb.2012
Next time we'll talk a bit more about this subject - a bit more in detail.
*Eventually I will discuss tripods and camera steadiness - stay tuned.
11Feb.2012
MindZoom
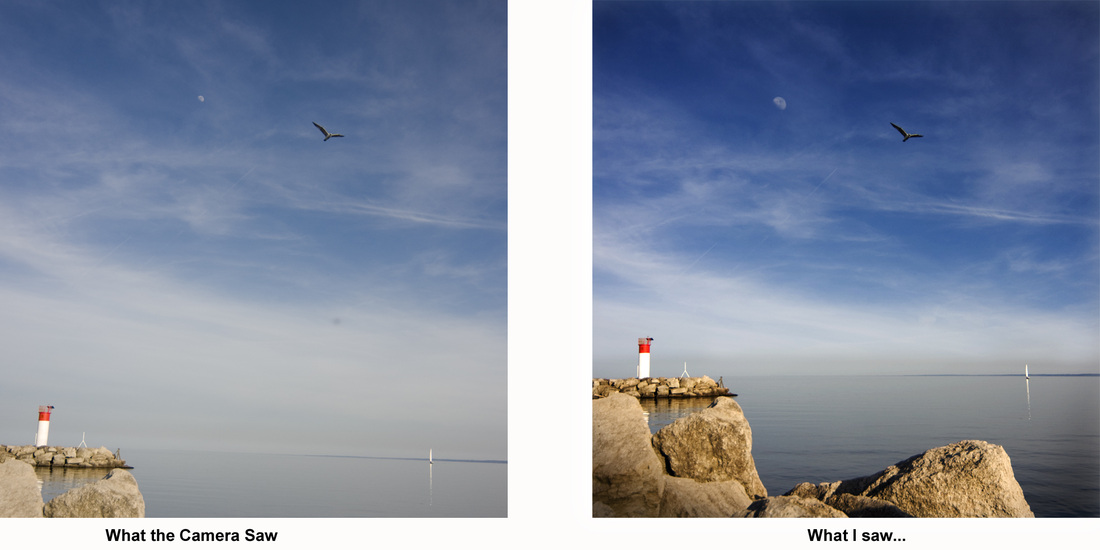
Photographs can mean different things to different people. We make photographs for different reasons as we will discuss in a later post. Photos can be interpreted by different people in different ways. Through the magic of photographic capture and post processing, they can also be greatly different than the original scene. This can work both to your advantage as well as to your disadvantage. To produce something you will enjoy looking at later, you have to come to some understanding of what your mind is "seeing" before you create the picture, as well as, what others’ minds will see when they view the end result. Your task is to convince, firstly the camera, then your targeted audience – to see what your mind visualizes.
The human mind is given tools (gifts) and how it uses these tools to process information and interpret data, perceive pleasure and pain can often be somewhat distorted from reality.
The Mind has the ability to zoom in.
The mind can use the eye to zoom in on a subject and make it seem much larger than it is. Probably the most ‘classic’ example of this is to try to take a picture of the moon in a scene (without the help of a humongous telephoto lens). What seemed like a basketball sized moon when you were taking the picture will seem tiny on paper. It happens too often.
I suspect that maybe this is related to the term "wearing blinders", in that we focus exclusively on what we are looking at the exclusion of all that is in our periphery. We still see the stuff in our peripheral vision, but it's less important in terms of what we are really looking at.
It is said that a lens of focal length somewhere between 40 and 50mm (35mm film equivalent) is equivalent to human eyesight. This may be true, but many times, I have snapped a photo with that focal length and found that the result is far from what I "saw". My mind had zoomed. The hawk sitting on the tree was so much closer, the moon was bigger until I pressed the shutter button.
So… how do we get around this? Well, firstly, when capturing the scene, the first step would be to visualize as much as possible what it is and why you are pointing your camera at. Look around through the viewfinder at the entire scene and ask yourself if that's what you intended to put on paper (or screen etc.). Of course, cropping later is a possibility, but if at all possible, why not try to get as much of the picture right when snapping the shot. Of course, lens limitations, versus situations (ie: if I get closer to that bear I will likely be it's supper) will hinder us from time to time, but if you can...why not?
Next is - in post processing. Ok - there are the purists who will disagree. If you are a purist who insists that photos should never lie, never be modified in post then just stop reading here because you will be disgusted. But stay tuned - we'll come back to "photographic truth" as a subject another day. The only thing I will say about post processing is - Please don't overdo it? There is a fine line, but how photographers can go so far over this line and not realize it is beyond me (again, topic for another day). I will say on the subject of post-processing however, that it's ALMOST NEVER as good as getting it right in the camera if this is at all possible.
Visualize.
The point of all this? In the interest of capturing shots you will enjoy looking at later (isn't that the point?), visualize what it is you are capturing. First - why? Why are you snapping this photo? What is your subject and why is it so interesting that you want to capture it? Secondly - what do you want the resulting picture to look like. Remember, especially if "art" is what you are striving for, that an artist starts with a canvas and puts only what he wants on this canvas. Consider what you see through your viewfinder your "canvas". Why clutter it with stuff that's irrelevant to your vision?
Want more reading on this? Ansel Adams was the master of visualization (and a great teacher of this). David duChemin explains this stuff very well in his books amd his website. Have a look at their material.
4 Feb. 2012
Who has seen the wind?
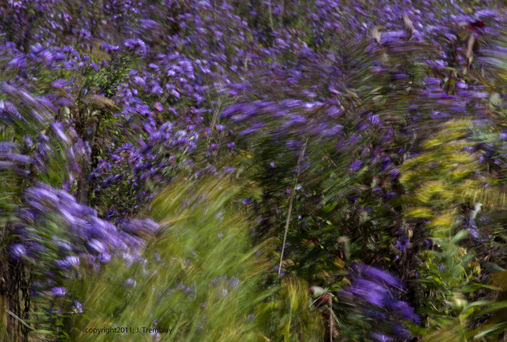
This began as an experiment - a long exposure to capture a mix of the beautiful fall purples and yellows in a soft pillow as the wind had its way with the wildflowers. In a somewhat failed attempt (not quite long enough exposure) I think I captured the texture and form of the wind itself. Look closely... see the waves, see the form. I believe we can see wind!
Tell a story
You know those times when a single picture doesn't quite capture the essence of what you're seeing. Whether it be an action sequence, or a discovery, or anything that has changes in the basic composition... here is an action sequence of Andrew clowning around. He had it all figured out, except perhaps for that last bit - the landing. Send in some stories, I will post them.
challenge...
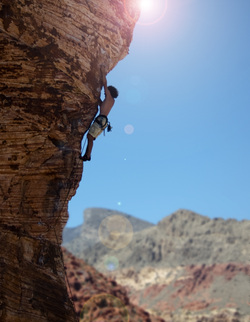
I saw a T-shirt that said "If you're not on the edge, you're probably taking up too much space"
My challenge was to shoot an appropriate shot that this slogan could apply to.
In Nevada, just outside of Las Vegas, on the way to Red Rocks canyon is a beautiful place to capture rock climbing from a relatively safe venue. This guy's partner was shouting all kinds of encouragement to him. (note: bring water, sunscreen and good footwear if you go there).
jt
"Misquotes" challenge:
To find photos that best exemplify the following quotes (or "mis-quotes"):
- A little rough around the ages
- Altar Ego
- Arterial Motives
- Praying for keeps
- The early daze
- Focal chords
- Drop Anger
- He's from another dementia
- Non-prophet
Photo Essay projects (based on music) to Consider:
Based on the following quotes:
1. "Planet Earth is Blue, and there's nothing I can do..."
2. "The words of the prophets are written on the subway walls, and tenement halls..."
3. "Freedom's just another word for..."
1. "Planet Earth is Blue, and there's nothing I can do..."
2. "The words of the prophets are written on the subway walls, and tenement halls..."
3. "Freedom's just another word for..."
